Six In Seoul
  • Our Life in Seoul Take 3
  • Our Life in Seoul, Take 2
  • 2015 Project 365
  • Project 365
  • Moving to Korea?
  • Six in the Hood
  • Seoul, 4/2008 - 4/2010
    • Flower Arrangements
    • Our second month here.....
    • Our first month here, 4/08
    • Flat Stanley
  • The Whole 30

Chicken and Dumplings

12/11/2009

4 Comments

 
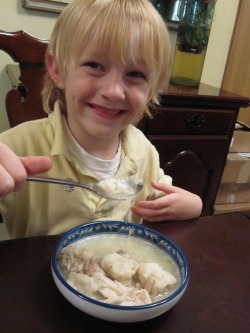
Tis the season for warm things for dinner!  And chicken and dumplings is just what Boy 2 ordered!   When ever I make chicken and dumplings Boy 2 always wants me to make extra so he can have leftovers for his lunch the next day!
Picture
I tried getting this recipe from my mom because she made the best chicken and dumplings EVER, but she is the type of person that throws a little of this and a little of that in and I could never mimic her recipe.  So one day when I was at a friends house and she was throwing out a ton of cookbooks, I noticed this cookbook ~ Old Fashioned Country Cooking and it has the "Cracker Barrel" name and logo on it, so I saved it from being sent to the dump (she really wasn't throwing them in the trash, she was taking them to the thrift store or somewhere like that).  I adapted the recipe a little and it is pretty close to how my mom used to make them!

Old-Fashioned Chicken and Dumplings

1 3-pound chicken
2 quarts of water 
2 cups all-purpose flour
1/2 tsp baking soda
1/2 tsp salt
3 TBL shortening
3/4 cup buttermilk

salt and pepper to taste

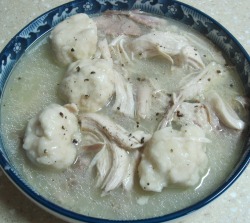
Boil chicken in 2 quarts of water.  Once boiling reduce heat and simmer for about 1 hour, our till tender and chicken is easily coming off the bone. Remove chicken from broth to cool, de-bone chicken and cut or shred into bite size pieces. Put chicken back in the broth, and bring broth to a boil. 

While waiting for broth to boil, combine flour, baking soda & salt.  Cut in the shortening.  Add buttermilk and stir with a fork until moistened.  Knead the dough 4 or 5 times then flatten till about 1/2 inch thick.  Pinch off dough into 1 1/2-inch pieces and drop into boiling broth.  Reduce to medium heat and cook for about 8-10 minutes.  Stir occasionally.  Add salt and pepper to taste.

Picture
4 Comments

Pasta Salad with Chicken, Grapes & Feta

8/2/2009

5 Comments


The first time I had this salad, I was moving from Ft. Leavenworth, Kansas (my 2nd favorite duty station behind Seoul), to Ft. Hood, Texas.  We were actually heading to the Great Wolf Lodge for 5 days, then on to Texas.  Why is this important you ask? Because I remember eating this salad the parking lot of the Great Wolf Lodge with my fingers, and I had a really hard time sharing it with Hubby.  My friend and neighbor Amy made this for our car trip,  as soon as I could call her for the recipe, I did.  Thanks for this Amy, it has been a staple in our house every since.

This is one of the easiest and yummiest (is that even a word?) salads!  Every time I make it for a backyard BBQ, or take it anywhere, someone always ask for the recipe. This salad is perfect for summer & everyone in my house will eat it.

Picture
OK, so I must apologize up front, as there are not real 'amounts', I will guess the best I can, but you need to adjust according to your own taste.

* I box of Tri-Color Rotini (cooked according to the directions on the box, and cooled)

* 3 boneless skinlees chicken breast, sprinkle with lemon pepper and bake.  (Or you can use any leftover chicken you might have laying around)  Cut up into bit size pieces.
*1 cup chopped carrots
*1 small container of grape tomatoes cut in half
*1 cup or so of green grapes
*1 package of feta cheese, crumbled
*1 bottle of Leo’s Italian salad dressing- the only place I have ever seen this sold is Jason’s Deli.  Now since I can’t get that here, I use 1 package of Good Season’s Zesty Italian.  (Go ahead and follow the directions on the package and actually make the dressing, don’t just throw the seasoning in there).

Mix all ingredients together, chill & enjoy!
5 Comments

Grilled Flank Steak and Veggies

5/14/2009

1 Comment

 
Picture
Paula came for dinner again last night....this recipe is very simple and pretty good - I like the marinade on the veggies better than on the steak.  It is hard for me to change the way I make flank steak, but I did last night, and I was disappointed.  I've been making flank steak the same way for the past 10 years, the way my friend Sandy made it the night I started eating red meat again.  I had been red meat free for almost 10 years when Sandy invited us over for dinner.  It was a last minute thing, and flank steak was what was on the grill & hubby was/is a steak lover and did not get it very often...so we were game and headed on over.  I put one tiny piece of steak on my plate that night, took one tiny bite, then another, then another, then another, until the entire plate of steak was gone.  From that day on, my cholesterol levels have never been the same.   So, I am going to give you both Sandy & Paula’s veggie recipe…
(if you want to try Paula's steak...just add the marinade to the steak as well as the veggies.)

Flank Steak by my good friend Sandy

Soy Sauce
McCormick Grill Mates Montreal Steak Seasoning

Sprinkle both sides of steak with steak seasoning, then marinated in soy sauce 10-15 minutes.  Cook on grill until desired doneness for you.  I over cooked the one in the picture above. L Depending upon how spicy you like your steak, add more steak seasoning while cooking.

Simple & delicious.

Michael’s Company’s Coming Grilled Steak and Veggie Supper – minus the steak

The Deen Family Cookbook

 1 ½  TBL soy sauce
1  TBL Dijon mustard
2 cloves minced garlic
1/4 cup vegetable oil
2 med zucchini cut into 1 ½ inch chunks
1 large red bell pepper cut into 1 ½ inch chunks
1 large onion cut into 1 ½ inch chunks

In a bowl whisk together soy sauce, mustard, garlic and veggie oil. 

Thread veggies on skewers, brush wish marinade.  Cook on grill for about 10 minutes or till tender.  

****Don’t be afraid to add any other veggies you might have hanging out in your fridge!


1 Comment

Seared Scallops with Pineapple -Cucumber Salsa

4/30/2009

5 Comments


I got a new Paula Deen Cookbook yesterday.  It was on a whim, I saw it wanted it, bought it. Normally I don't just jump like that - first I have to read the cover, look through the pages...I might put it in my cart, walk around and decide, 'Oh, I don't need that', then I put it back on the shelf.  I mean who really 'needs' a new cookbook when you have the internet?  Not this time, I left it in my cart.  Paula has been on my mind for days. I have been dreaming of her Lemon Blossoms, I have wanted to make them for over a week, but circumstances have prevented it.  When I saw her cookbook, I started dreaming of all that butter, butter and more butter.   Well to my shock and awe, I found this recipe...can you believe it, NO BUTTER at all

This recipe was very good with just he right kick and it was quite easy to make, even though I have a hard time searing scallops.  I don't know why, but they never turn out 'just right’...I will keep trying. (I thought they were dry enough...)  Also, I could not find sea scallops, so I used small bay scallops.


Seared Scallops with Pineapple-Cucumber Salsa
Adapted from The Deen Family Cookbook

Salsa 

1 cup diced peeled cucumber
1 can diced pineapple
3 TBL chopped cilantro (plus a little extra for garnish)
1 TBL diced red onion 
2 ½ tsp lemon zest
1 large jalapeno diced

Scallops
2 pounds sea scallops
Salt and pepper
2 ½ TBL olive oil

1.        Mix all salsa ingredients together and set aside.
2.        Rinse scallops and pat them very dry, then season them with salt and pepper
3.        Warm the oil in a large skillet over medium-high heat.  Sear the scallops, without moving them in the pan until golden – 2-3 minutes on each side.
4.        Put Salsa on a plate, put scallops on top of salsa, sprinkle with fresh cilantro

Paula says to add 1/4 tsp hot sauce to the salsa, but quite honestly, I forgot. It was not missed.

5 Comments

Blackened Chicken Pasta

1/23/2009

10 Comments


Many moons ago I worked at Dave & Busters in Dallas,  while there this was my favorite thing on the menu.  I begged the cook for the recipe.  Over the years I have modified it and it has become one of the favorite dishes in our house.  Now, I am going to try my best to give you accurate measurments, however, I just toss stuff in, so play with it a bit if you would like. 

One ingredient you must have is Chef Paul Prudhomme's Poultry Magic.  Sometimes this can be hard to find, especially if you live in Korea!  If you live here, have a good friend send some to you.  :)  State side HEB & Kroger typically sell it.

Ingredients:

1 TBL olive oil
2-3 minced garlic cloves
1 (8oz) package mushrooms, sliced
2-3 Roma tomatoes, diced
1-2 tsp Chef Paul Prudhomme’s Poultry Magic

 2 TBLS olive oil
3-4 minced garlic cloves
3-4 boneless skinless chicken breast, cut into bite size pieces
Chef Paul Prudhomme’s Poultry Magic 

For the sauce:
1 pint heavy whipping cream
¾ cup chicken broth
About 4 oz grated parmesan cheese
About 4 oz grated pecorino Romano cheese
1-2 tsp Chef Paul Prudhome’s Poultry Magic

1 package of your favorite pasta cooked per instructions on package.

Directions:
Heat 1 TBL olive oil in pan, add garlic sauté for about 30 seconds, and add mushrooms. Sauté for about 3-4 minutes or until mushrooms are nice and soft, add tomatoes, and sprinkle with about 1-2 tsp poultry magic and cook for another minute or two.   Remove mushroom, tomato mixture from pan and set aside. 

Using the same pan, heat 2 TBLS olive oil, add garlic, sauté for about 30 seconds, and add chicken.  Sprinkle with a crap load of poultry magic.  (Normally I use about ½ the bottle)  Cook until chicken is no longer pink.   

For the sauce:
In a sauce pan heat 1 pint heavy whipping cream & ¾ cup chicken broth – DO NOT BOIL.  When whipping cream and broth are hot, add cheeses, 2 ounces at a time, stirring with a wire whip constantly.  When the sauce is at the consistency that you like, stop adding cheese you may need a little more or less than the amounts I put down.  I like my sauce to be a little thinner than the normal alfredo sauce.  Add 1-2 tsp poultry magic, mix in.  
 
Pour sauce over pasta add chicken, mushroom & tomato mixture to pasta, combine. 


10 Comments

Individual Size Chicken Pot Pie

1/17/2009

6 Comments


When I was a kid, pot pies were a treat.  No, not the homemade pot pie like I make, but those small frozen pot pies, the ones that were on sale.  They could have been Swanson, Banquet or the generic Kroger brand. Kroger is where my mom shopped all the time, and I NEVER got to go with her, although I always wanted to.  It didn't matter to me the brand of pot pie, a pot pie was a pot pie, I love them all equally, well except for the beef.  I have one memory that included a pot pie...I had been playing out side with my sister, l am pretty sure she had just made me eat a mud pieJ.  Mom had just come home from Kroger, my sister and I rushed into the house to help her unload (I loved to help unload the groceries so I could see what she bought), I found the bag of pot pies.  My memory tells me that I ask my mom very politely if I could have one (I must have been 8 or 9), but I am pretty sure it was not that easy, now that I have kids and I understand a bit more how they work.  It probably went something like this:

Me: "can I have a chicken pot pie"

Mom: "No, it's almost time for dinner”

Me: “but please, I’m starving”

Mom: “no, we will be having dinner soon”

Me: “please, please, please, I’m so hungry I didn’t have anything for lunch and I am starving!”….more begging and pleading, until mom gave in and let me have  that pot pie.  (I was the 10th of 10 children and she didn’t have much fight left in her)

You all know the pot pie I am talking about right?  You are supposed to let it sit out at room temperature for some ridiculous amount of time, like and hour, then you cut slits in the top, then cook it for an hour?  Remember I told you in an earlier post how I don't really like to wait?  It was worse then.  I popped that pot pie in the oven, cooked it at a higher temperature for a shorter amount of time.  When it was "ready" I took it out of the oven, it was boiling around the edges, and still frozen in the middle. I didn't care. I mixed it all up and it was the right temperature.  Boy that was a good pot pie.  But it pales in comparison to the pot pies I make today.  I don't think my kids have ever seen a frozen pot pie.

I got this recipe from my mother-in-law who has been making it for years.  She got the recipe from Ina Garten, The Barefoot Contessa.  I adapted it from her original recipe.

6 split chicken breast (or one whole chicken - whichever you prefer)
5 cups chicken stock
2 tsp chicken base (you can use bouillon cubes if you don’t have base)
12 TBL butter
1 ½ cup onion
¾ cup flour
¼ cup heavy whipping cream
2 cups diced carrots
1 cup diced celery
1 cup frozen green beans
1 cup frozen corn
Salt and pepper to taste 

For the pastry:
3 cups flour
1 ½ tsp kosher salt
1 tsp baking powder
½ cup shortening
¼ cup cold butter, diced
½ to 2/3 cup ice water
1 egg beaten with 1 tbl water - for egg wash

In a large pot bring 6 cups water with 2 tbl chicken stock to a boil, add chicken, boil for about 35 minutes, throw in carrots, celery and onion. boil another 10 minutes or until chicken is done.  Remove chicken from pot, let cool.  When chicken is cool enough to handle remove all meat from the bones and dice into bite size pieces.  In another large pot, or Dutch melt the butter over medium low heat, add the flour cook stirring constantly for 2 minutes, add 5 cups of the hot chicken stock (avoiding adding the veggies at this time).  Simmer over low heat for 1 more minute stirring until thick.  Add 2 tsp salt and 1 tsp pepper and the heavy cream.  Add the chicken, and veggies an mix well.

For the pastry, mix flour, salt and baking powder in the bowl of a food processor.  Add the shortening and butter.  Pulse 15 times or till the shortening & butter are pea sized.  With the motor running add the ice water, process only enough to moisten the dough and have it just come together.  Dump the dough out onto a floured board and knead quickly into a ball. Wrap the dough in plastic and allow to rest in the refrigerator for 30 minutes.

For the potpies…I used 4, 5 ½ inch bowls and 4, 4 inch bowls.  If you want you can make a deep dish pot pie with this as well.  Fill your bowls, whichever you decide to use.    Separate the dough accordingly and roll out.  Brush the outside edges of each bowl with egg wash, Trim your dough to fit just over your bowls….decorating as beautifully as you would like, or not. Brush the dough with egg wash and make 3 slits in the top.  Place on a baking sheet and bake for 1 hour, or until the top is golden brown and the filling is bubbling hot.

 ***be creative, use whatever veggies you your family like, or make it beef if you prefer....gag!

6 Comments

Beef Wellington

12/31/2008

1 Comment


This was my first attempt at Beef Wellington; I got rave reviews from all who ate it.  It was surprisingly easy, as long as you are a little patience (ughh). Read all the way through to ensure you do not make the same mistakes I made.

I looked at tons of recipes for Beef Wellington, and decided to adapt my recipe from Gordon Ramsay's, I watched his video on you tube to see how he made it.

Here is my version of the recipe...
5-7 pound beef tenderloin

Salt & pepper
1 tbl vegetable oil
8 oz shitake mushrooms
10-12 thinly sliced prosciutto
English mustard for brushing meat
Pastry puff (I used 1 sheet from a Pepperidge Farm package)
2 egg yolks

Preheat oven to 375 degrees F

 Trim your beef tenderloin of excess fat.  Sprinkle with salt and pepper.  Heat oil in large pan and quickly sear the beef on all sides.  Remove and allow to cool.  Once fully cooled, brush generously with the English Mustard.  

***Gordon made it a point to say NOT to use Grey Poupon. Now, I must admit, I had no idea what English mustard is, and I didn’t know if I would be able to buy it here, I mean come on, we don’t have specialty stores on every corner.  I was prepared to go against the warnings and I was going to use the forbidden GP.  Well, to my surprise I found English Mustard.  The brand I found is Colemans, and it was a in a tiny jar, 3.5 ounces.  The taste is very strong and has a bit of a horseradish taste to it, although there is no horseradish listed in the ingredient list.   I only used ½ of the jar because I was afraid it would be too strong, but next time I will use the entire jar.  

Roughly chop the mushrooms, then put them in the food processor to for a puree.   Place the mix in a hot pan and allow the water to evaporate.  When the mixture is sticking together nicely, set aside to cool.

Roll out a generous length of saran wrap, lay out the prosciutto, each slightly overlapping the last, and make it large enough to cover your tenderloin.   With a pallet knife spread the mushroom mixture evenly over the prosciutto. 

 Place the tenderloin in the middle of the ham/mushroom, and keeping a tight hold on the saran wrap from the outside edge, neatly roll the prociutto ham and mushrooms over the beef into a tight barrel shape.  Twist the ends to secure the saran wrap.  Refrigerate for 10-15 minutes, this allows the Wellington to set and helps keep the shape.  

Roll out the pastry large enough to cover your beef.  Unwrap the meat from from the saran wrap.  Egg wash the edge of the pastry and place the beef in the middle.  Roll up the pastry, cut any excess off the ends and fold neatly to the ‘underside’.  Turn over and egg wash over the top.  Chill again to let the pastry cool, approximately 5 minutes.  Egg was again and cut decorative lines on the top of the puff pastry before baking for 30-40 minutes. 


 ***Learn from my mistake and use a meat thermometer to cook the meat to the wellness you desire. I feel I overcooked the meat a little.

***One more thing, I would place on a roasting rack during the cooking process so the bottom of the Wellington will not be soggy.


1 Comment

Herb Roasted Pork Tenderloin and Sauteed Zucchini

11/18/2008

1 Comment


This post is for Staci.  You should never be afraid of seafood, but since you are I thought I would post something I know you will like.  When you come to visit I will make sure I have plenty of PB&J on hand for seafood night at our house!  :)  I got both of these recipes from my friends Lara's website.  This is Lara's favorite recipe for pork tenderloin.  Her kids LOVE this zucchini & call it "the good zucchini".  I wish I could say the same for my kids, but as always, they turn their noses up at anything green.

I have made both of these dishes several times now and everyone loves both dishes!  (With the exception of my kids not liking the zucchini, but what do they know?) 


Herb-Roasted Pork Tenderloin

1/4 cup soy sauce
1/4 cup Worcestershire sauce
1/4 cup vegetable oil
1 teaspoon dried thyme
1 teaspoon dried marjoram
1 teaspoon rubbed sage
1 teaspoon garlic powder
1 teaspoon onion powder
1 teaspoon ground ginger
1 teaspoon salt
1 teaspoon pepper
1 (1 1/2-pound) package pork tenderloins


Stir together first 11 ingredients in a heavy-duty zip-top plastic bag. Prick pork with a fork, and place in marinade, turning to coat. Cover or seal; let stand at room temperature 30 minutes, or chill 2 hours or up to one day (longer is better). Place pork in a roasting pan.

Bake at 350° for 40 minutes or until a meat thermometer inserted into thickest portion registers 160° to 165°, depending upon your desired degree of doneness.

Slice tenderloin, spooning marinade over the top, or serving on the side. NOTE: Do NOT use marinade if you have not cooked the meat in it.


Lara's Good Zucchini

1) Cut each zucchini in half lengthwise. Slice each piece crosswise into thick (about 1/2 inch thick or a little more) semi-circles.

2) Heat 1 Tbsp. butter over medium-high heat in a large, wide skillet until melted and slightly foamy.

3) Add some zucchini slices (about one zucchini's worth) to the pan, being careful not to overcrowd the pan. This is important; if there are too many in the pan, they will steam, rather than brown.

4) Sprinkle the topside of the slices with a little bit of Baby Bam.***

5) Keep a close eye on the slices and turn them over with a pair of tongs as soon as they are nicely browned on the bottom.

6) Allow the slices to brown on the bottom side and remove them from the pan when they're nicely browned on both sides, but still firm. If the slices are getting too soft, then your pan isn't hot enough. If the butter is smoking or burning, your pan is too hot (the butter should turn a nice, nutty golden brown).

7) Add more butter to the pan, if necessary. Repeat with remaining slices, working in small batches until all your squash is done.

 ***I use Creole Seasoning instead of Baby Bam.

1 Comment

Oysters, Muscles & Salmon!

11/15/2008

2 Comments


I took the family and a few friends and Flat Stanley (to find out more on Flat Stanley, click the Flat Stanley tab to the left of your screen) to the fish market this past week. 

This is what we had for dinner that night:

Oysters on the half shell, served with lemon wedges, horseradish sauce, and I forgot to put out the tabasco.  It doesn't matter; they were the best oysters we have ever had.


We also had muscles steamed in RAO's Arrabbiata sauce served with crusty garlic bread to soak up the sauce.

 I grilled the salmon and made a lime-garlic butter for the sauce.  Hubby LOVED this sauce. 

1 large garlic clove, chopped
1/4 cup fresh lime juice
1 teaspoon salt
1/2 teaspoon black pepper
1 stick (1/2 cup) unsalted butter, melted

Purée garlic with lime juice, salt, and pepper in a blender until smooth. With motor running, add melted butter and blend until emulsified, about 30 seconds.

2 Comments

Chicken, Sausage, Potatoes and Peppers in the Oven

11/12/2008

3 Comments


Fall is one of my favorite times of the year, in fact; maybe it is my favorite time of the year.  I love looking out my back door and seeing the vast array of colors on the trees.  Once the crispness in the air sets in, my cooking starts to change, we start having soups, stews, and "home cookin"!  I love a good bowl of chicken and dumplings, chicken pot pie, chicken fried steak and this recipe, Chicken, Sausage, Potatoes & Peppers in the oven.
This recipe is adapted from one of my favorite cookbooks, RAO's Recipes From the Neighborhood, everyone in our house likes this, the little kids pick out the peppers, but other than that, it is a hit all around and OH SO EASY, Kathie, this is one I think you can do! 

Chicken, Sausage, Potatoes and Peppers in the Oven


**1 (2 ½ - 3 lb) chicken, cut up
***1 pound sweet Italian sausage, casing removed and cut into bite size pieces
2 large baking potatoes peeled and cut into bite size pieces
2 large bell peppers cut into bite size pieces ( I like to use one red and one green for color)
2 small onions, cut up small enough so your kids cannot identify them
4 garlic cloves, minced
1 28 ounce can diced tomatoes, with juice
½ cup olive oil
2 tsp dried oregano
Salt and pepper to taste

Preheat oven to 450 F.

Combine the chicken, sausage, potatoes, peppers, onions, and garlic in a roasting pan large enough to fit all in ingredients comfortably.  Add the crushed tomatoes with their juice.  Drizzle olive oil over the ingredients.  Season with oregano, salt and pepper.  Roast in the oven for about 1 hour and 15 minutes, stirring every 20 minutes.  The dish is done when the potatoes are tender and the chicken pulls away easily from the bone.

 **I have used boneless chicken breast and although it is good, it is better with bone in chicken.  Just trust me.

***I really like to use the hot Italian sausage, but if I do my kids will not eat this dish, so if you don't have picky eaters, try the hot!

The picture below is just before it went into the oven....


And this is after the meal  (Hubby told me to take this picture and post it!)...

3 Comments
<<Previous

    Author

    Proud Army wife and mother to 4 wonderful children.  I love to cook, travel, work out and scrapbook life’s adventures when I find the time.  We just got orders & are heading back to the states in March 2010.  I'm bummed that our time has been cut short, but proud of Hubby for the reason why.

    RSS Feed

    Archives

    April 2010
    March 2010
    February 2010
    January 2010
    December 2009
    November 2009
    October 2009
    September 2009
    August 2009
    July 2009
    June 2009
    May 2009
    April 2009
    March 2009
    February 2009
    January 2009
    December 2008
    November 2008
    October 2008
    September 2008
    August 2008
    July 2008
    June 2008

    Categories

    All
    Appetizers
    Breakfast
    Cake
    Cakes
    Car Wash
    Cookies
    Cooking Tips
    Daily Life
    Desserts
    Drinks
    Entrees
    Hiking
    Modeling
    Moving To Yongsan
    Nightlife
    Not Quite Right
    Recipes
    Restaurants
    Salads
    Sandwiches
    Seafood
    Shopping
    Side Dishes
    Sightseeing
    Soups
    Spices
    Street Food
    Vacation
    Vegetarian

    Friends, Family and Fun reading:


    FeedYourKids
    GreatinGreece
    CookieMadness
    RomaninRoundRock
    Heather, Heath, Hayden & John
    EggsonSunday

    Five in Boise
    PioneerWoman
    Just The Four of US 
    SteamyKitchen
    All About Korean Food

    KissMyKimchi
    EatingOutLoud
    TheThrashClan
    Yossislost

Proudly powered by Weebly